To import a file containing item data, follow these best practices:
- Create the same number of columns in SciNote that you wish to import from your Excel (.XLSX), .CSV, .TXT, or .TSV file.
- Refer to this article on how to create custom inventory columns
- *Please note that certain column types cannot be imported into SciNote
- File custom columns
- Item Relationships (parent/child relationships)
- Columns with the "range" setting (date, date&time, or time columns with "range" enabled)
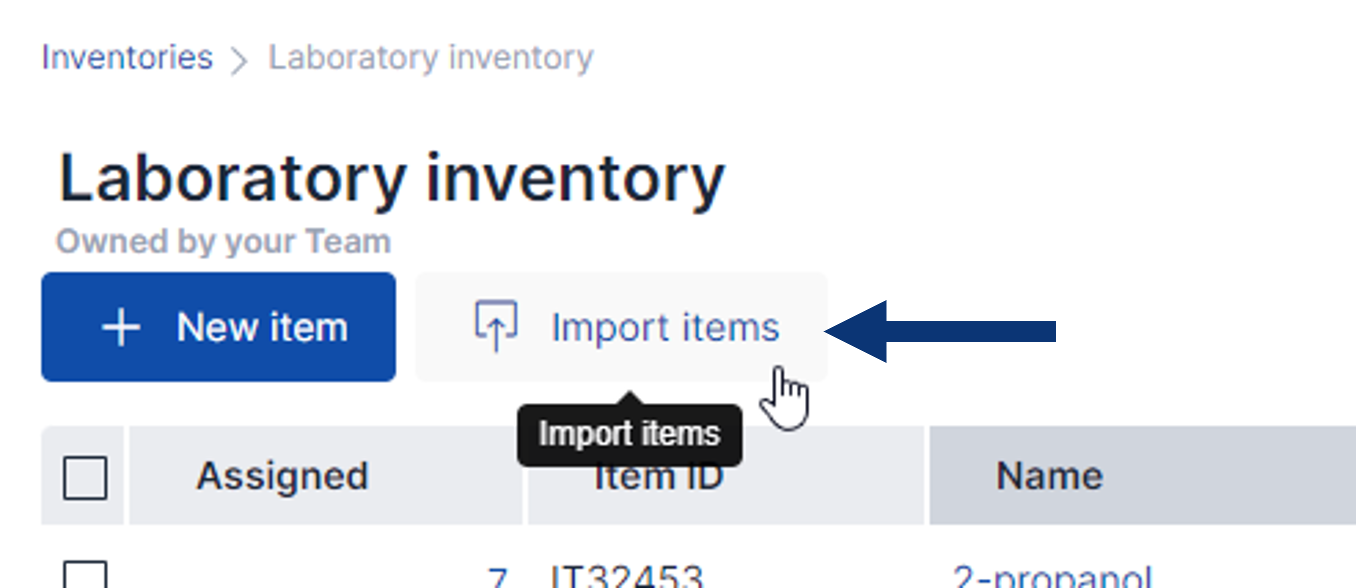
- Click on the Import items button.

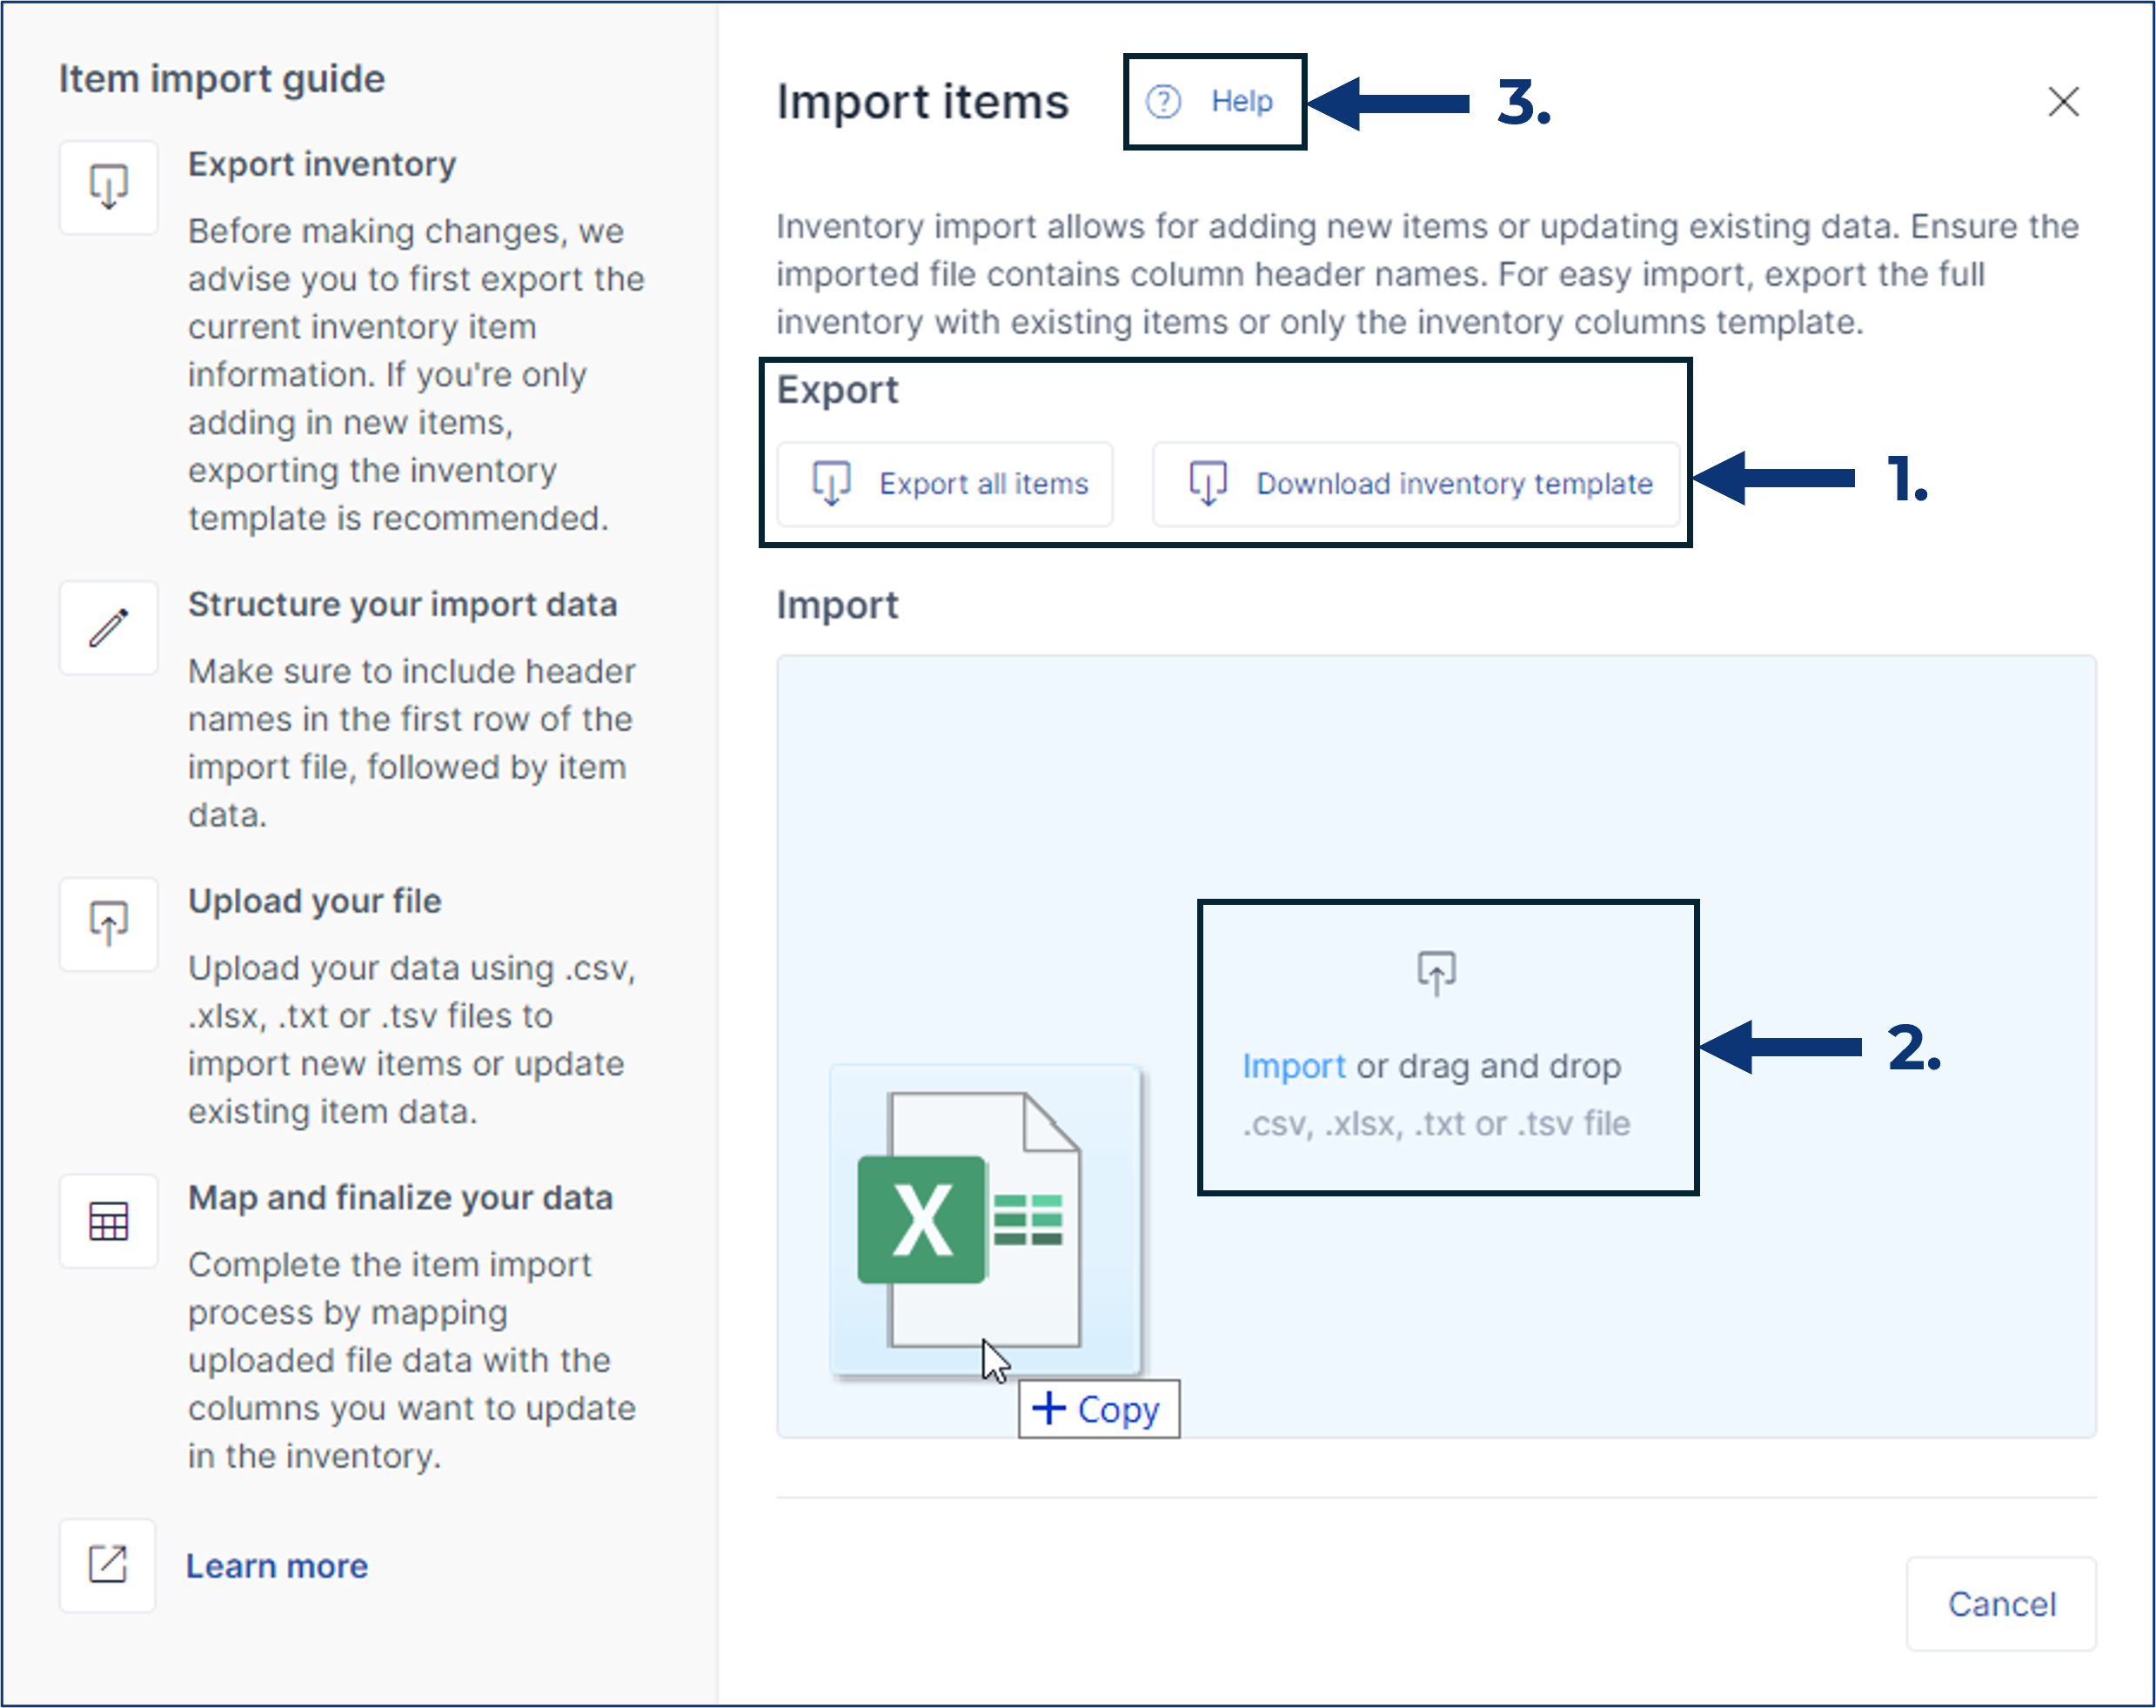
- A pop-up will provide more info and instruct you to choose a file.
- You can click Import to select a file from your device, or simply drag and drop an import file into the blue box area
- From the popup, you can also access the item import guide, download an import template file, and export a file of all current inventory item data.

- Number 1 in image above – For easier inventory item data prep, we added two options to help you prepare the correct import file format:
- An Export all items button exports a file (choose .XLSX or .CSV) with the current inventory items’ data. This is practical when updating existing items to ensure you’re working on the latest data and preserving a current snapshot of the inventory.
-
*NOTE – .CSV exports have dates exported in the same format as is set for Date Format in their individual user preferences
This also means, that if importing to inventories from .CSV, the dates in the file MUST match the preferences format to import correctly. If they don't match, the dates won't import.
-
- A Download inventory template button exports a file with all the column headers from your selected inventory. Using this template, simply add item data to this file, and it will already have the structure needed for a seamless import.
- *Every inventory export file now includes a new Instruction sheet explaining how to prepare the files for import when adding new items and bulk updating existing inventory items in SciNote.
- An Export all items button exports a file (choose .XLSX or .CSV) with the current inventory items’ data. This is practical when updating existing items to ensure you’re working on the latest data and preserving a current snapshot of the inventory.
- Number 2 in image above – When you have your file ready, simply drag and drop it to the blue square to import
- Number 3 in image above – You can access the item import guide by clicking the “Help” button
- You can click Import to select a file from your device, or simply drag and drop an import file into the blue box area

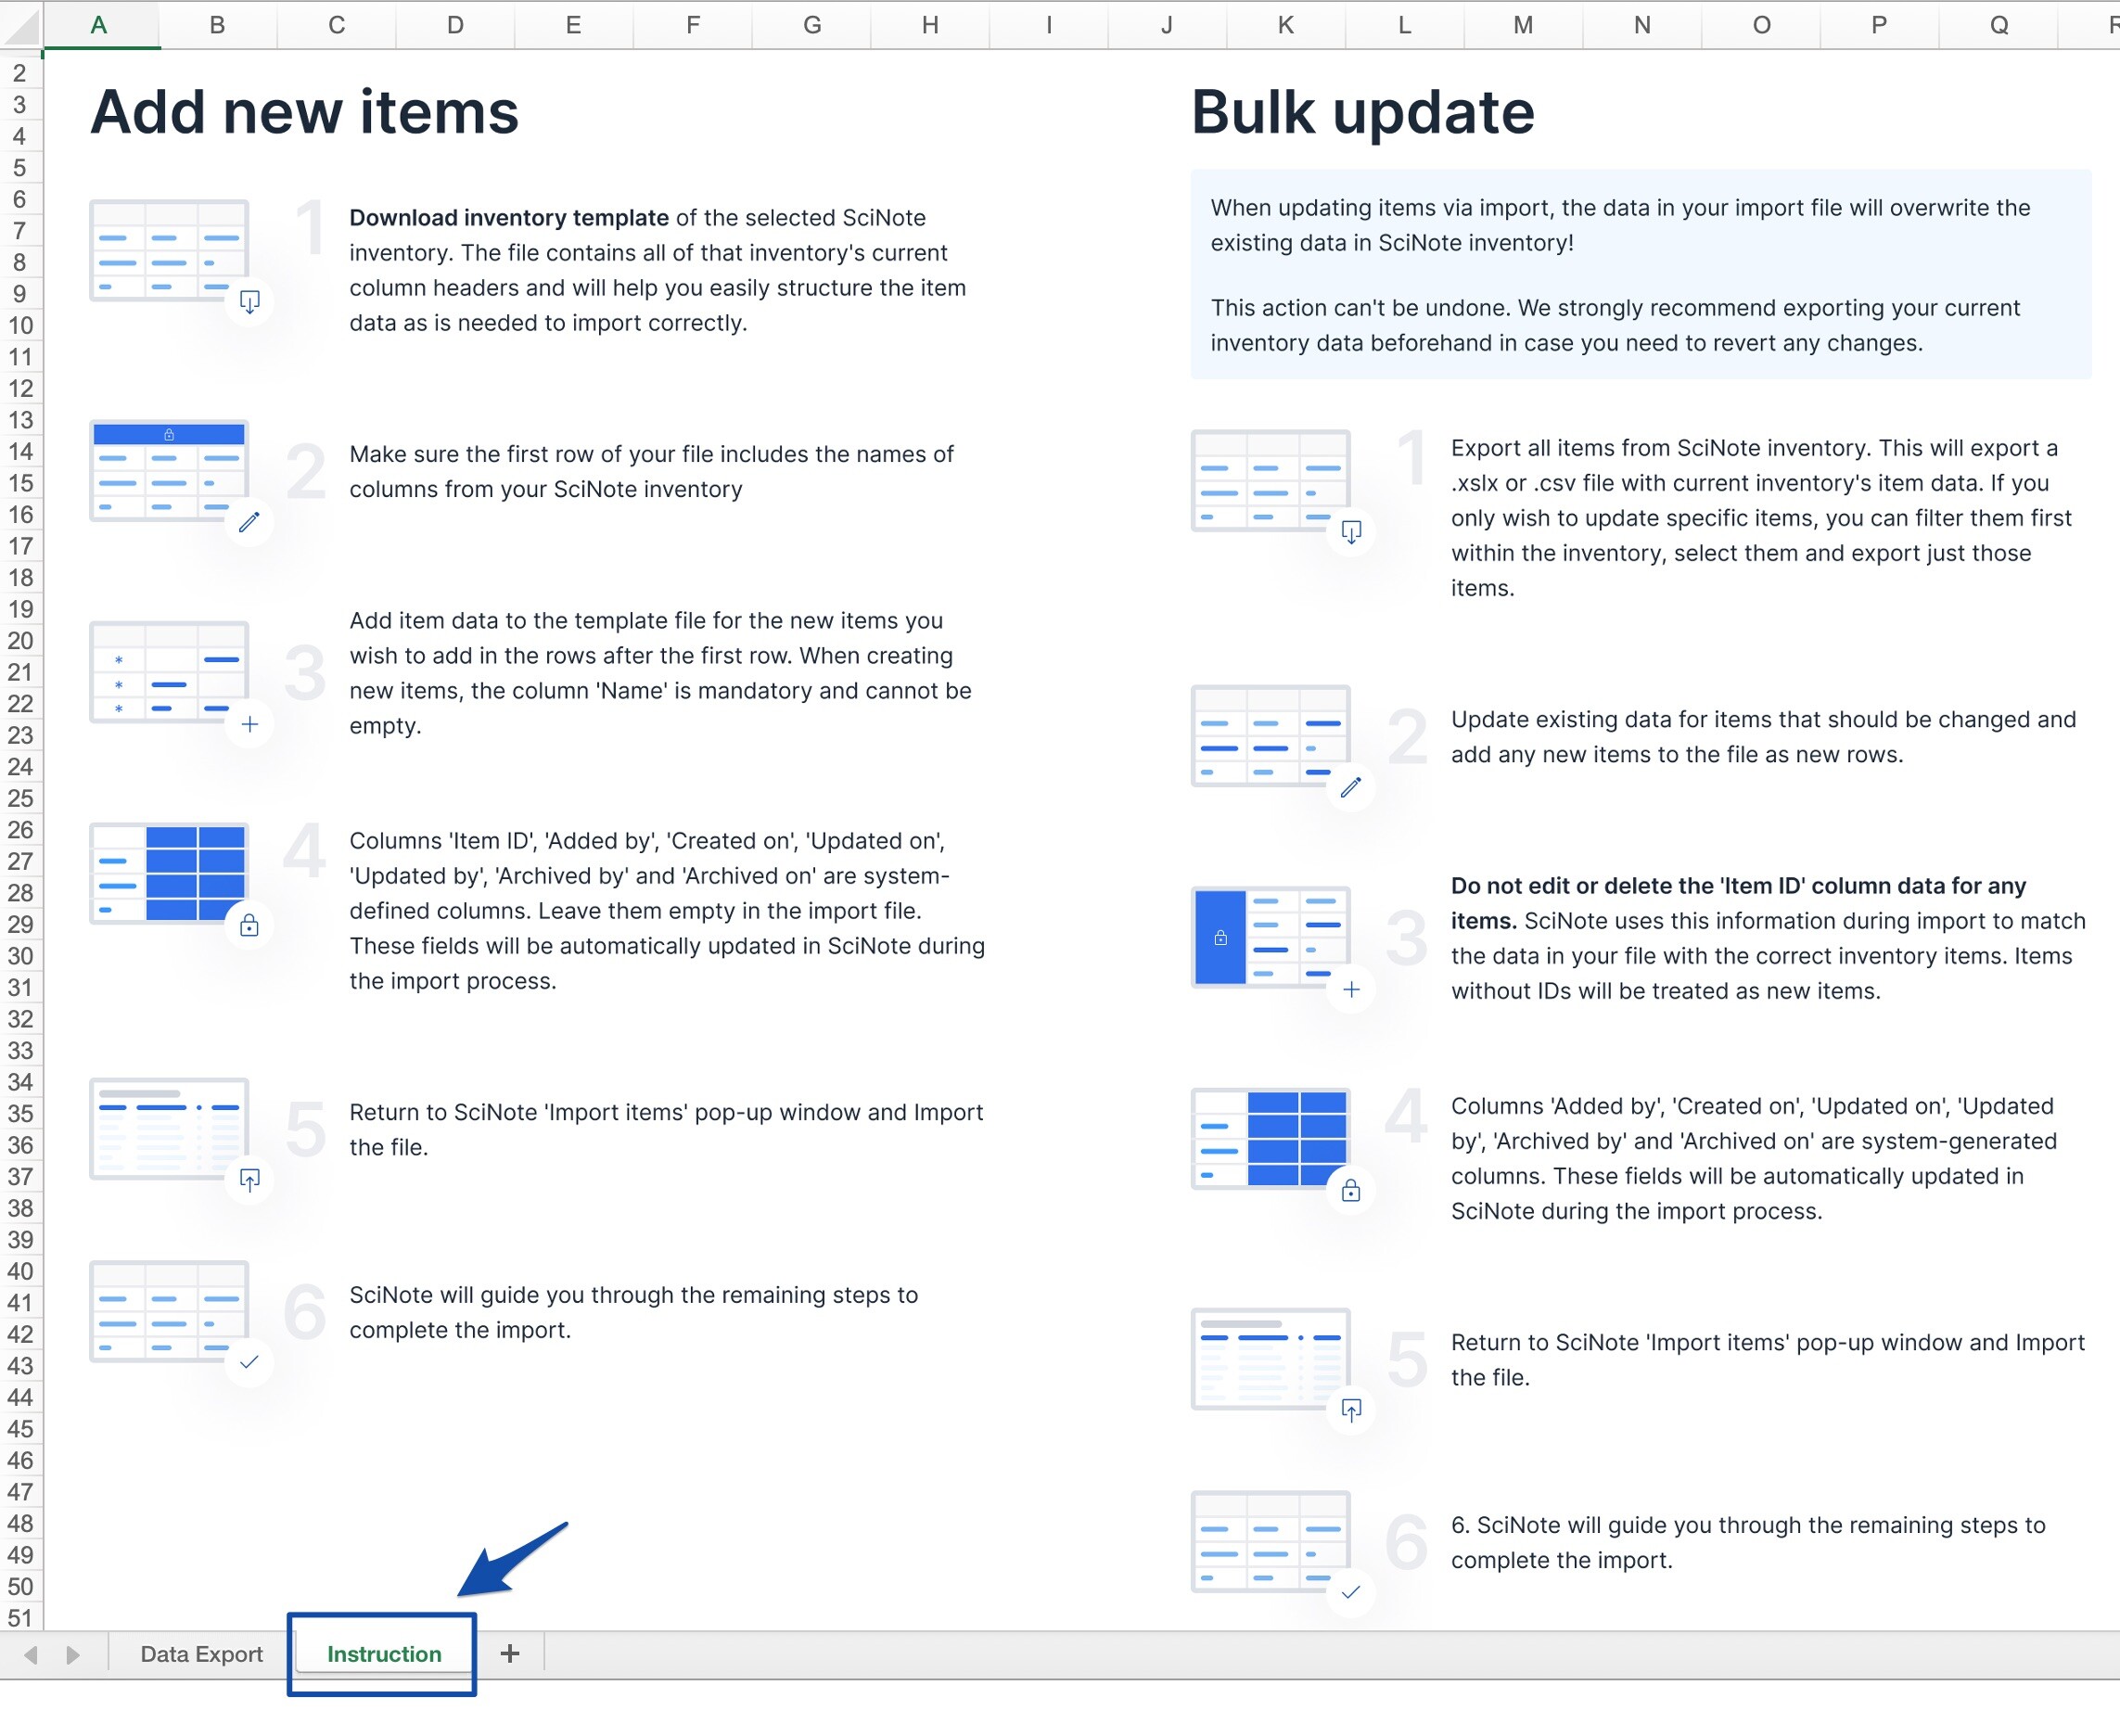
Make sure the first row of your import file includes the names of the columns from your SciNote Inventory!
Columns 'Item ID', 'Added By', 'Created On', 'Updated on', 'Updated by', 'Archived by', and 'Archived on' are system-defined and system-generated.
You can leave these columns empty in your import file. They will be automatically updated in SciNote during the import process.
*When EDITING existing Items within a SciNote Inventory, you must keep the 'Item ID' data in the import file, or else SciNote will create new items. SciNote matches the item data in the file according to the 'Item ID' column.
Only keep the 'Item ID' column empty if you wish to create new Items, each with a new 'Item ID'.
*When importing values into a DROPDOWN custom column for your items, make sure that the values in your import file match exactly what is set up within the column settings (including capitalization, etc.). If they differ, the new values will be added to the column settings automatically.
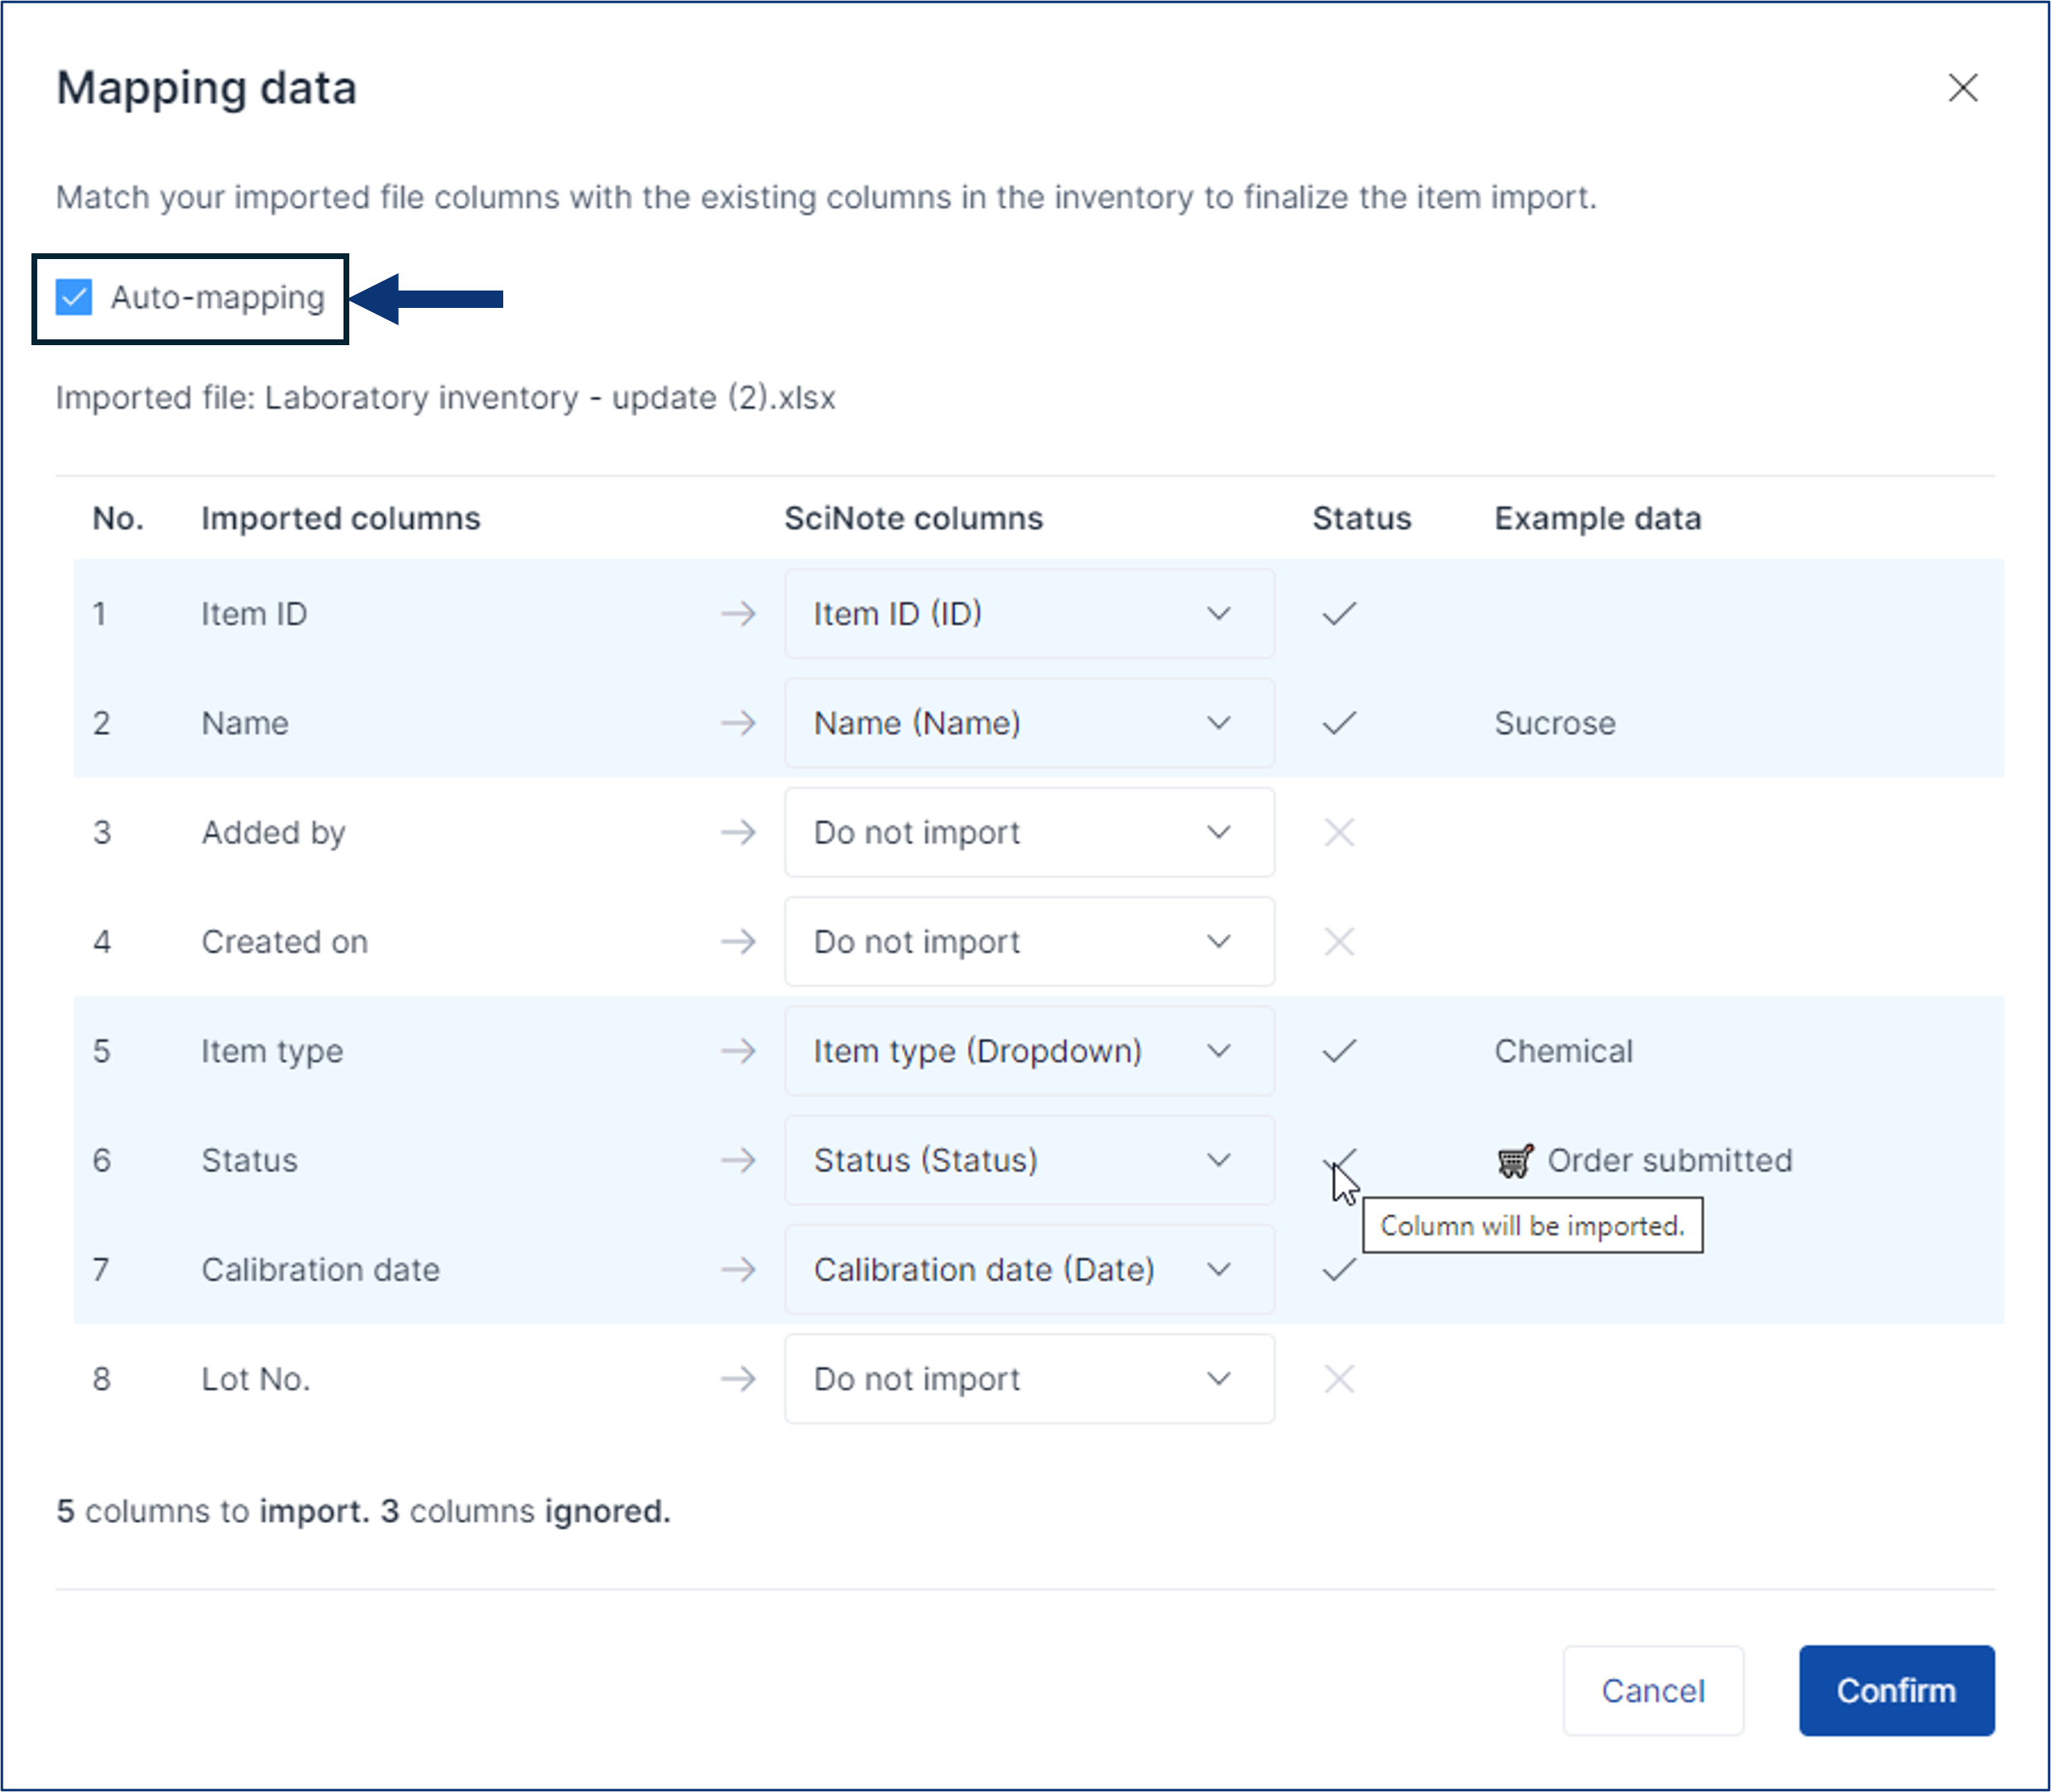
4. After uploading your import file, you will next map data to match the columns of your uploaded file to the columns in the SciNote inventory.
-
-
SciNote will automatically map the columns by matching column names from your imported file with the ones in your SciNote inventory. Review the mapped columns and click Confirm to continue with the import.
-
If you want, you can unselect the Auto-mapping function in the upper left and map the columns yourself manually instead
-
For manual mapping, Do not import in the 'SciNote columns' column means these will not be imported
-
-
Matched columns that will are set to fully import are marked with a check mark symbol (✔️) and those that will not import are shown with an X (✖️) symbol in the Status column.
-
The third possible Status is the blue "info" icon (ℹ️). This occurs when an automatically matched column is manually changed and the name of the new SciNote column selected doesn't match the name of the imported column.
-
Take caution, as data from the mapped column will still import to the selected SciNote column in this case.
-
-
-

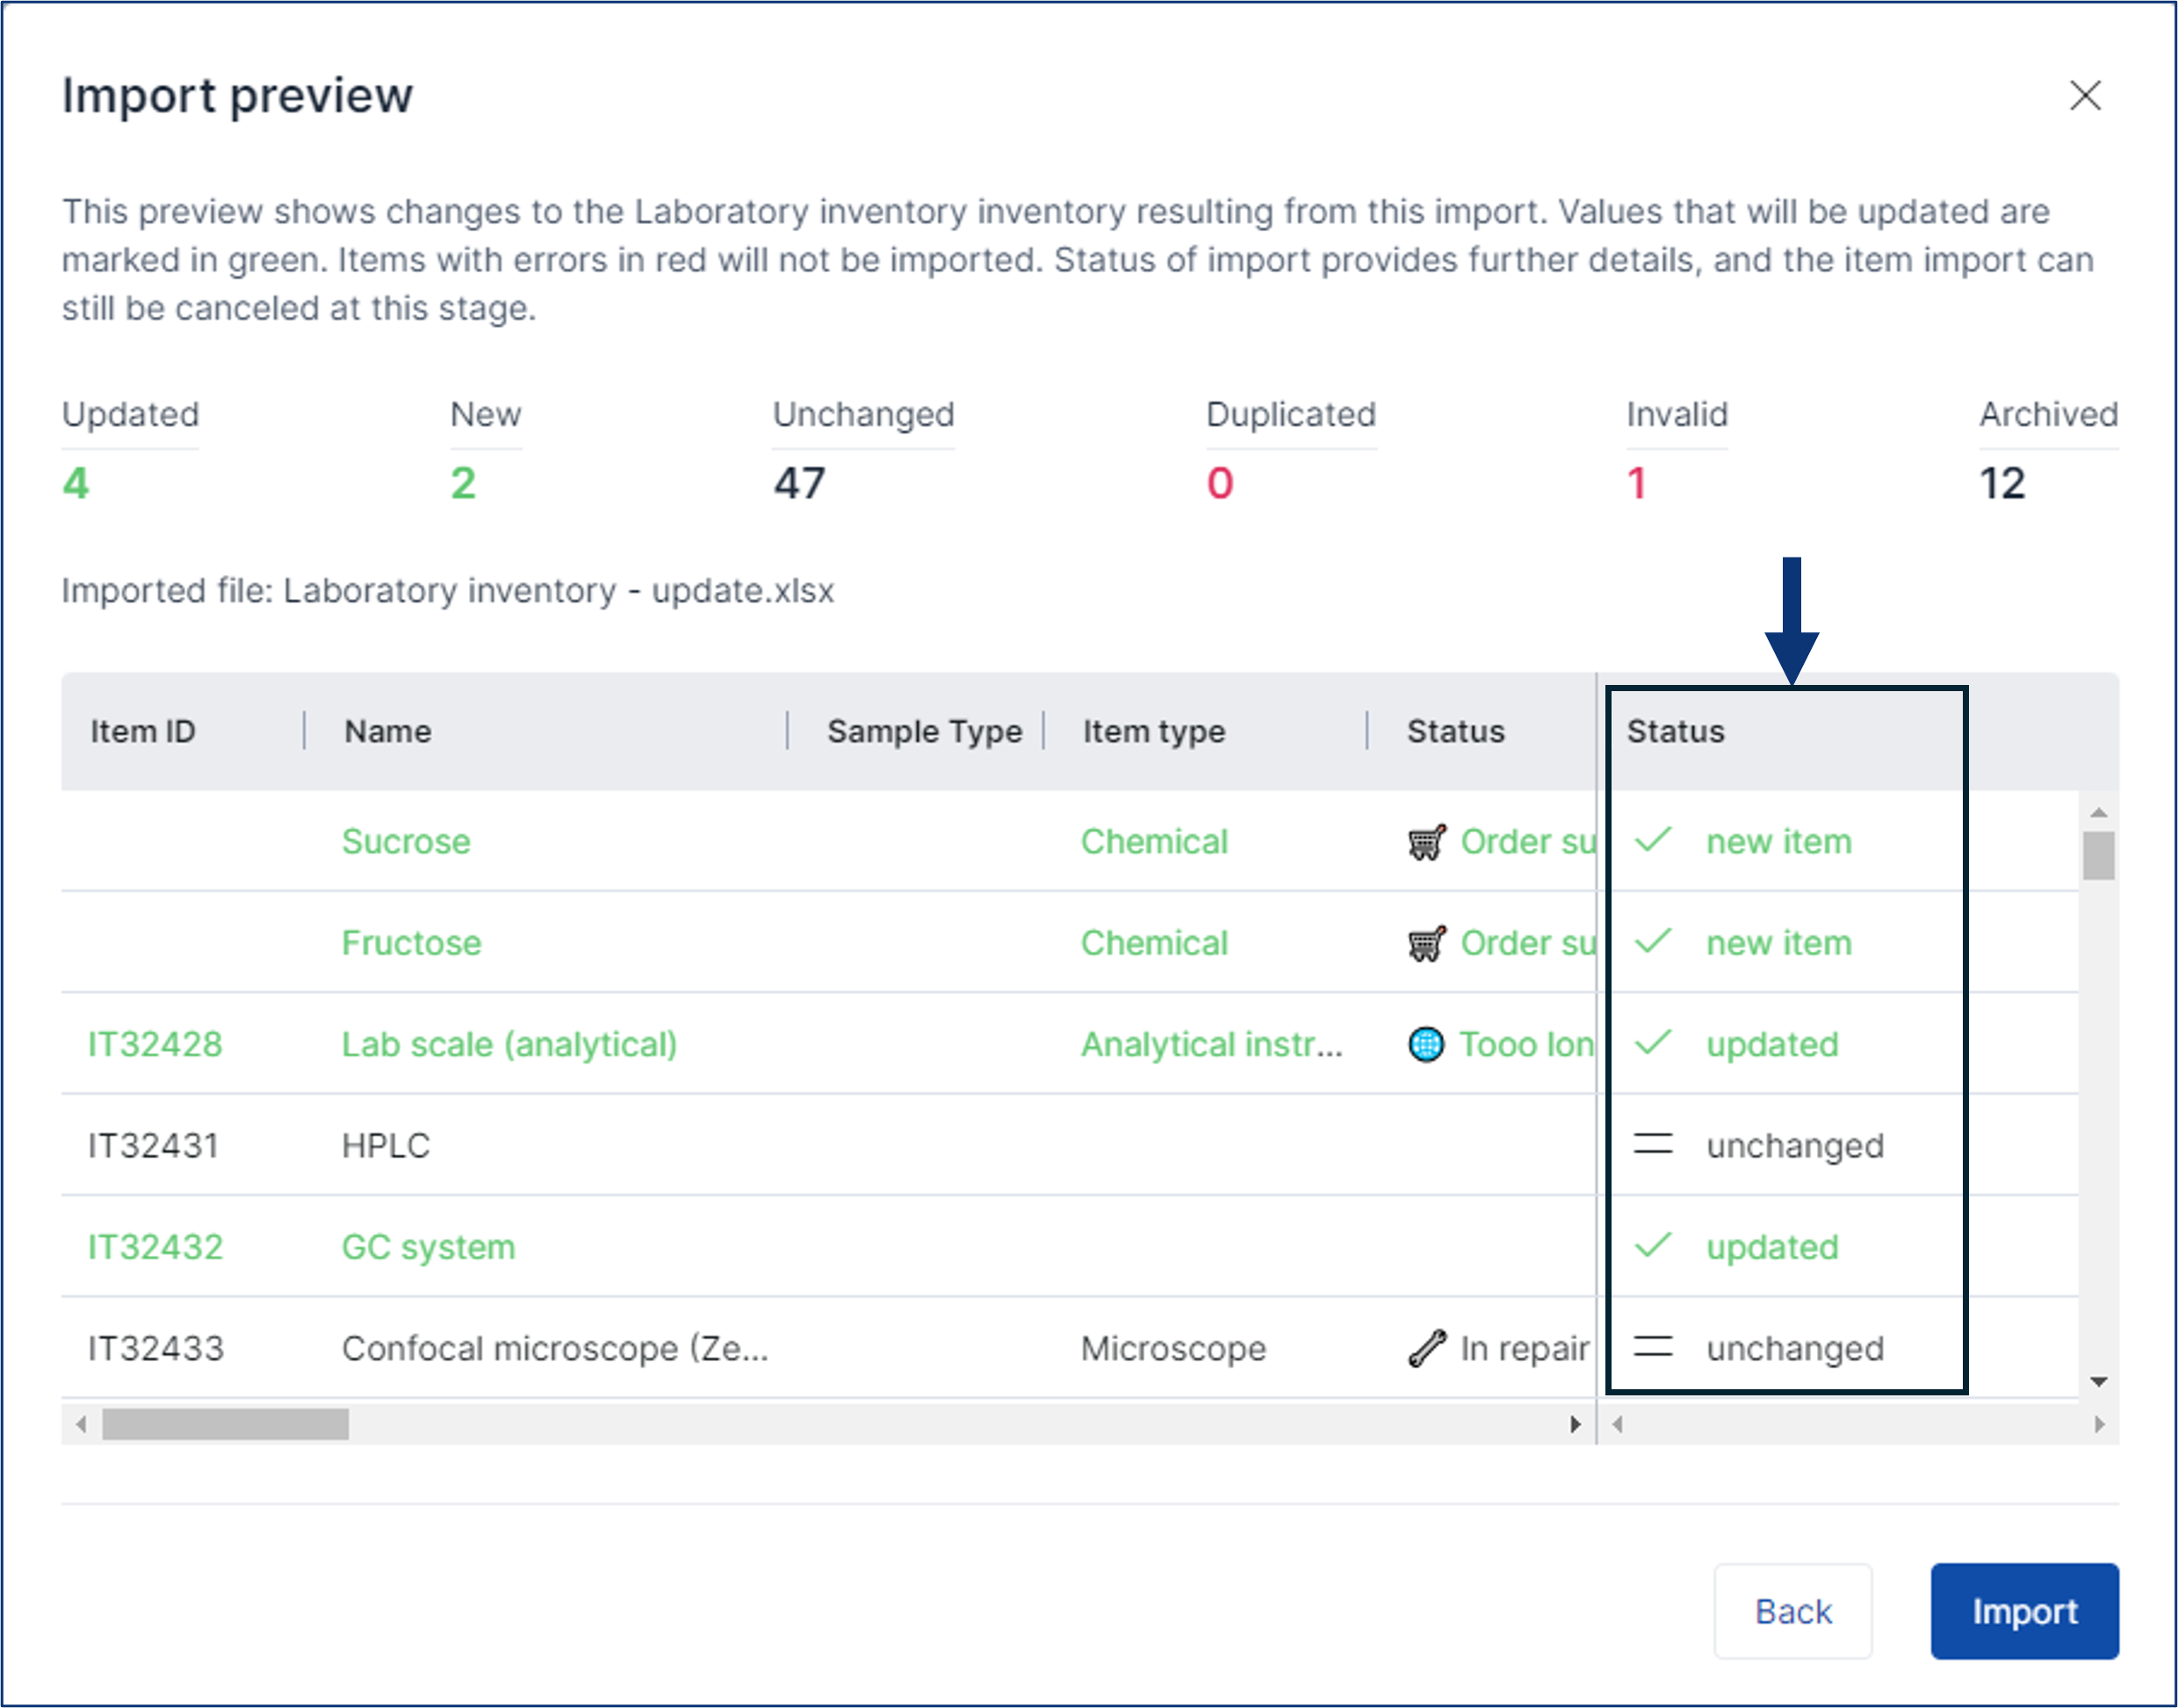
5. Review and verify the Import preview.

-
From this popup, you can do a final review of the imported data. This preview displays pending changes resulting from the imported file. At this stage, you can still cancel the import by clicking Back.
- The preview indicates in green which items are newly added (New ) or which will be Updated after clicking Import.
- Any detected errors are marked in red (e.g., items with the same or a nonexistent Item ID in the file, items with no Name, etc.). These items/rows will be automatically omitted, however you can still import the other data.
- Duplicated rows indicate your import file has two rows with the same Item ID
- Invalid rows indicate that there's an issue with that item row that needs to be resolved before the item data can be imported:
- The listed Item ID doesn't exist in the SciNote Inventory
- The row has no Item Name
- There are too many characters imported into a field for the row (e.g., maximum 10,000 characters for a Text column)
- There are letters or non-numeric characters imported into a Number column

-
- If you have some Unchanged and or Archived items in the file, they will be marked in black (the default color).
6. Once you've reviewed the Import review, click Import to finalize the import changes to your inventory items.
IMPORTANT: Please note that when bulk updating items via import, the data in your import file will override the existing data in your SciNote inventory!
This action can’t be undone. We recommend exporting your current inventory data beforehand in case you need to revert any changes.
*Please Note: if you wish to import a date into SciNote, the Excel (.XSLX) format should be DD-MMM-YYYY. All inventory .XLSX export files export dates in this format, and the import for .XLSX will work best with this date format.
This does not apply when importing .CSV files.
If you have any questions, please do not hesitate to contact us at support@scinote.net. For more info about our Premium plans, request a quote.