How to Assign an Inventory Item to a Storage Location
You can assign an item an exact location within a grid box structure or a general location in a non-grid box.
To learn how to create boxes and locations, follow this article.
You can assign items manually or by importing them via an Excel (.xlsx) file. *Items can be assigned to more than one location at a time.
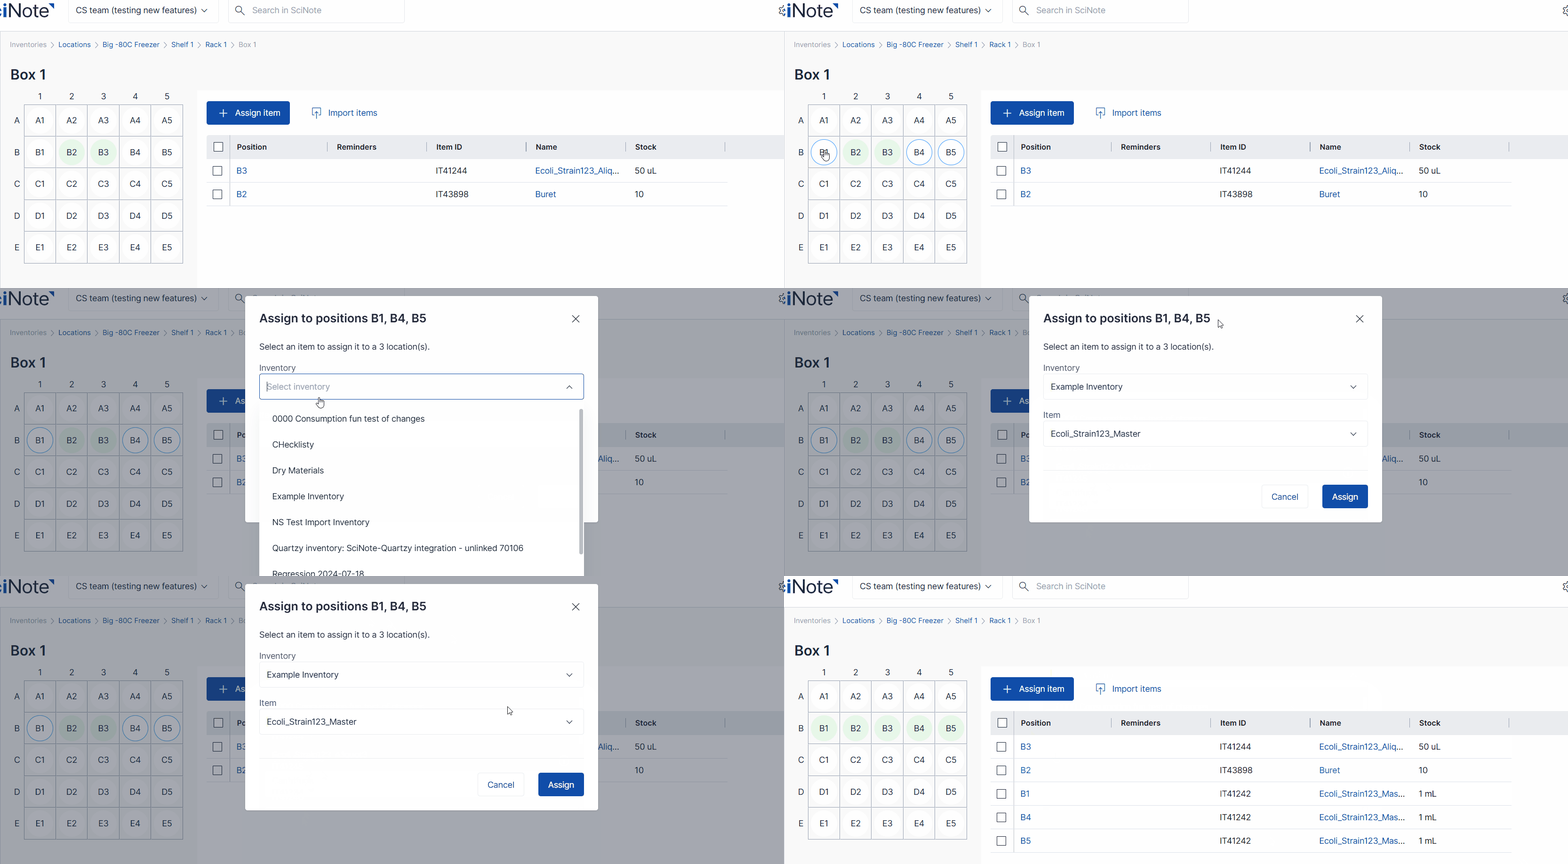
To manually assign an item to a grid location:
- Click on the box name from the location
- Click the blue "Assign item" button or the exact grid location letter and number
- Pro Tip – if you need to assign one Inventory Item to multiple box positions at once, click on all of the positions first (A1, E3, F9, etc.) and then click 'Assign item' to assign the item to multiple locations
- In the pop-out, select the inventory and item name from the dropdown lists
- If you clicked the "assign item" button, also select the row letter and column number for the desired storage location
- Click "Assign" in the bottom right
To Assign an item to an entire column or row:
- Click on the column's number or row's letter
- Click "Assign item"
- In the pop-out, select the inventory and item name from the dropdown lists
- Click "Assign" in the bottom right

To manually assign an item to a box without a grid:
- Click on the box name from the location
- Click the blue "Assign item" button
- In the pop-out, select the inventory and item name from the dropdown lists
- Click "Assign" in the bottom right
To assign items to storage locations via an Excel import:
- Click "import items" next to the assign items button when within a box
- Click "export current box" under the Export section header
- Add the Item's Name and Item ID to the Excel in the exact location ('Box position' column) if using a grid box. *If the box does not have a grid structure, simply add any new Item IDs and Item names in new lines underneath the last existing item.

- Save the file
- Click back on "Import items" from the box page in SciNote
- Click "Import" and select the file just saved or drag and drop the file to the blue box in the pop-out
*You can also edit box items using the Excel import from the Inventory page.
To assign items to storage locations via Item Card
- Click on the item name for the item card to appear on the right side of your screen
- Click Locations or scroll down to the locations section of the card

- Click Assign new location
- Navigate to the box by selecting the sub locations arrows
- Select the box name and the specific row and column using the dropdown if the box is a grid
- Click Assign

Reach out to your Customer Success Manager or fill out this form if you would like more information on how to enable item locations for your account.
If you have any additional questions, please contact us at support@scinote.net.
For more information about the Premium plans, please request a quote.


